You are here: Mobile App > Work Order Execution: Apple iOS Devices > Complete a Work Order

Complete a Work Order (Apple iOS Devices)

The following steps should be completed when you have finished with a work order and you are planning to mark it as Completed. Some of the steps below are mandatory and some of them you might need to do depending on the work you performed:

  1. When you are finished working on the work order, tap the Status row on the Work Order details screen. Show me

  1. On the Actions screen that appears, select Complete from the list of options that appears. Show me

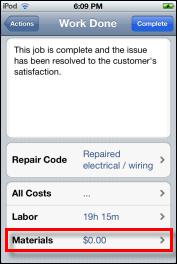
  1. (Mandatory) On the Work Done screen, tap the text field at the top and then enter any completion notes you have for the work order. Show me

  1. Alert: This is the only place you can enter completion notes for the work order. After you change the status to Complete, the completion notes text-entry field becomes inaccessible.
  2. (Mandatory) Tap the Repair Code field to select the repair category related to the work order. Show me

  1. In rare cases, you might have additional labor costs you need to add to the work order or the time recorded for the work order is incorrect. When that happens, you can update the time duration by doing the following:
    1. Tap the Labor row on the Work Done screen.
    2. On the Labor Costs screen that appears, tap the Add Labor Cost row. Show me

    1. (Optional) In the Labor Code field, change the labor code if the default value is not correct. Tap the Done button in the top right corner of the screen to save the new labor code and return to the Add Labor screen
    2. Tap the Duration field to enter the number of hours and minutes you spent on the job. Show me
    1. Tap the Save button in the top right corner of the screen.
    2. On the Labor Costs screen, review the total amount of time you have recorded for the job. If everything is okay, click the Work Done button in the top left corner of the screen. Show me
  2. If you have materials costs, add them to the work order by doing the following. Otherwise, jump to Step 7 below.
    1. Tap the Materials row on the Work Done screen. Show me
    1. On the Materials Costs screen that appears, tap the Add Materials Cost field.
    2. On the Find Material screen, search for a product or manufacturer by entering at least two letters in at least one of the fields and tapping the (Search) icon in the top right corner of the screen. Show me
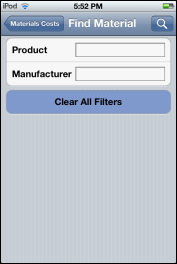
    Note: If your search returns no data, tap the Find Material button in the top left corner of the screen to return to the Find Material field and try a different set of search criteria.

    1. Tap the name of the product that you want to add to the work order. Show me
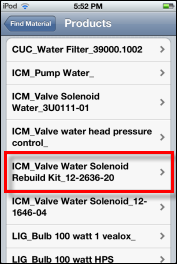
    An Add Materials screen opens, displaying the specific details, location, and default price of the selected item. Show me
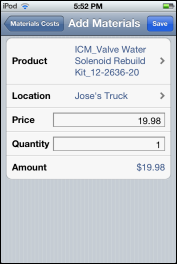
    1. (Optional) If you need to change the default price for the product, tap the Price field.
    2. Tap the Quantity field to enter the number of items to be added to the work order or leave the default set to 1 if you are only adding one.
    3. When you have finished, tap the Save button in the top right corner of the screen to save your changes and have them added to the work order materials costs list. Show me
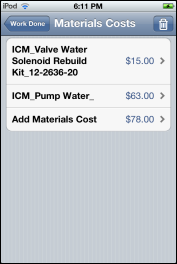
    1. (Optional) If you need to add more materials to the work order list, tap the Add Materials Cost field on the Materials Costs screen and repeat steps 6b through 6g.
    2. When you have finished adding materials, tap the Work Done button in the top left corner of the screen to view a summary of all of the work order’s costs so far. Show me
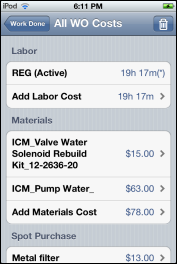
  3. After reviewing the costs, tap the Work Done button in the top left corner of the screen.
  4. If all information is recorded for the work order, tap the Complete button in the top right corner of the screen.

The status of the Work Order changes to Completed. Show me