You are here: Payments > Create and Post a Payment
Create and Post a Payment
To create and post a payment in CorrigoNet, complete the following steps:
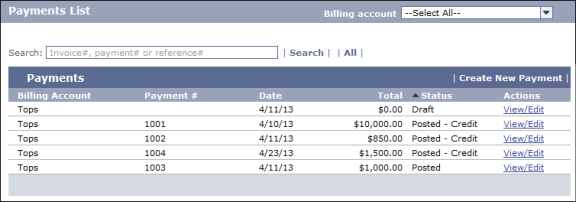
- Go to Financial > Payments List.
- On the Payments List screen that appears, click the Create New Payment button to begin creating a new payment in the system or click the View/Edit link for a current payment to add more money to it. Show me
- If you have not previously selected a Billing Account from the scope selector, a popup screen appears, requiring you to select one before continuing.
- The Payment Details popup screen then appears.
- Define the details of the new payment, including the billing account to which it will be applied, the payment type (check, cash, credit card, etc.) and the amount of the payment. Show me
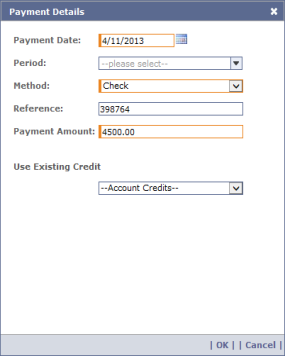
Note: For existing payments, the Payment Details screen appears when you click the "edit details" link on the Payment screen.
- After all details of the payment are entered, click the OK button
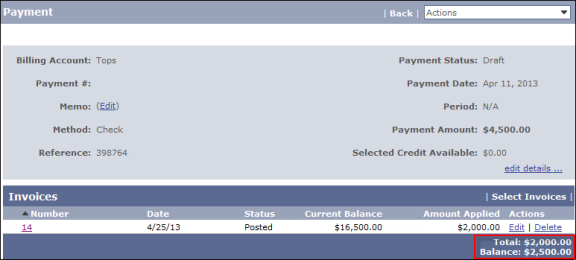
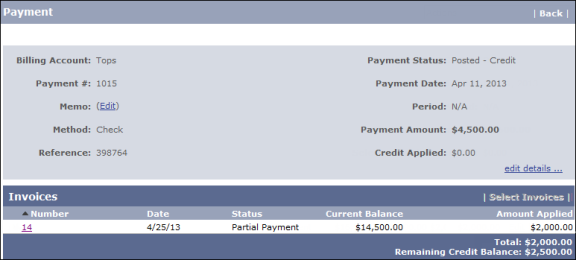
A Payment screen appears, listing all of the details of the payment, including its balance. Show me

- Click the Select Invoices button to open the Unpaid Invoices screen from which you can select an invoice or set of invoices to apply the payment to and designate how much of the outstanding balance on each invoice you want to pay off. Show me
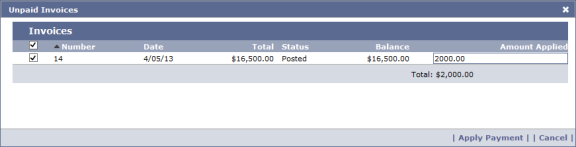
Note: You cannot apply more than is available from the payment and any selected credits.
- Click the Apply Payment button to add the payments to the selected invoices.
- The system then automatically determines how much of the original payment amount has been allocated and how much of it remains, and displays this information in the bottom right corner of the Payment screen. Show me
- When you are satisfied with the way the money has been distributed, click the Actions drop-down list and select Post to apply the monies to the invoices.
Note: After posting the payment, the payment allocations are locked in and it is no longer possible to make changes.
The system recalculates each invoice balance to show the current amount remaining and the amount just applied. If an invoice has a balance remaining, it is identified with a status of Partial Payment in the system. If all monies have been paid, the status changes to Paid in Full. Show me
-