Add Stock Locations
IMPORTANT: You
must create stock locations and grant users access to the locations in
order for them to be able to invoice materials.
To add a stock location, complete the following steps:
- Go to Materials > Stock Locations.
The Stock
Locations screen opens.
- Click the Add New button.
The
Stock Location Details screen opens. Show me
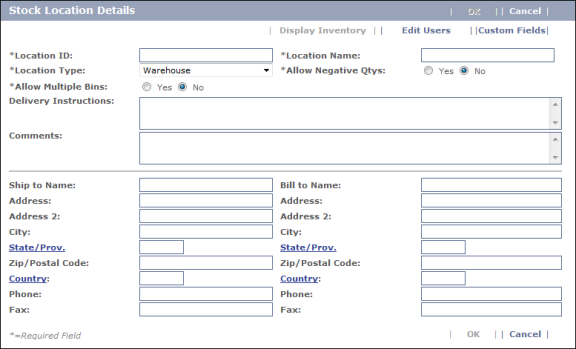
- Enter information into the following fields.
- Location ID
(required)—Enter a
unique identifier for this stock location.
- Location Name
(required)—Enter the
name of the location.
- Location Type
(required)—Choose
a location type from the drop-down list.
- Allow Negative
Qtys (required)—Select Yes if you want the system to record negative quantities when a greater number
of a given part is used than is on record in the system. For
example, if there are six pressure valves in the stock room but the system
says there should only be five, the six valves can be used and the system
will show a total quantity of –1 (minus 1) valve.
- Allow Multiple
Bins (required)—Select Yes if multiple bins can be used for materials to represent containers
in the physical stock location. When
using materials in work orders, you specify what bin to draw from.
- Delivery Instructions—Enter any special instructions regarding deliveries to this location.
- Comments—Enter any relevant comments about the location.
- Shipping and
Billing address and contact information—Optional
fields that allow you to enter address, phone, and contact details for the stock location and, if different from the shipping name, the
entity who will be billed for stock deliveries.
- Click the Edit Users button at the top of the screen.
The
Stock Location User Scope ID screen opens. Show me
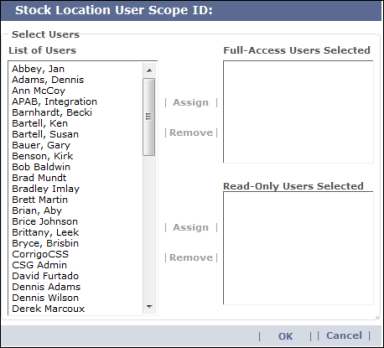
- Select the users you want to have full access
to the stock location (press Ctrl key for multi-select), then click the Assign
button next to the Full-Access Users Selected field.
- Select the users you want to have read-only access
(press Ctrl key for multi-select), then click the Assign button next to the
Read-Only Users Selected field.
- (Optional) Remove users from either field by clicking their names, and then clicking the corresponding Remove button.
- Click OK to return to the Stock Location Details screen.
- Click OK to finish creating the stock location.