Create a Check List
Check lists—also referred to as punch lists—can be created and saved as templates to be reused or created
ad hoc for individual work orders.
Create a Check List Template
To create a check list template, complete the following steps:
- Click the Work Orders tab.
- Click the Check Lists Administration option in the drop-down list that appears.
The
Master Check Lists screen opens. Show me

- Click the Add New button on the right side of the screen.
The
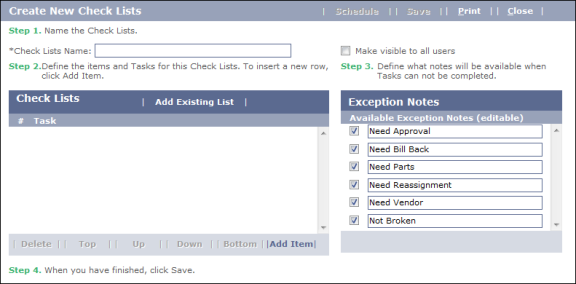
Create New Check Lists screen opens. Show me

- Enter a name in the Check Lists Name field.
- (Optional) Select the "Make
visible to all users" check box to make the check list available in all
work zones. Clear
the box to make the check list available only in the master list for the
work zone in which the template was saved.
- To base your new list on an existing one, complete the following steps:
- Click the
Add Existing List button in the Check Lists field.
- On the popup screen that appears, click the name of the check list you want to add to your new list.
- Click the Add to Check Lists button at the bottom of the popup screen.
All of the tasks from the check list you selected are added to the Check Lists field.
- (Optional) Click the Delete button at the bottom of the Check Lists field to remove any of the tasks that you do not want to include in the new check list.
- (Optional) Click the Top, Up, Down, and Bottom buttons to rearrange the order of the tasks that you just added.
- To add a new task line to the check list, complete the following steps:
- Click the Add Item button.
A new line item is added to the existing list.
- Enter a description of the task in the new line.
- Repeat the previous two steps for each additional task you want to add.
- In the Exception Notes field, select or rename the list of exception notes that end users will be able to select from if one of the check list tasks cannot be completed. Clear
the check boxes corresponding to any of the exception notes that you do not want to make available to end users.
- When you have finished, click the Save button at the top of the screen.
Create an Ad Hoc Check List for an Individual Work Order
To create a check list for an individual work
order, complete the following steps:
- Open the Work Order details screen for the work
order.
- In the Financial region, click the Logs/List tab, then the Check Lists subtab. Show
me
- To base the work order check list on an existing one, complete the following steps:
- Click the
Add Check Lists button.
- On the Add Check Lists popup screen that appears, click the name of the check list you want to add to the work order.
- Click the Attach Check Lists button at the bottom of the popup screen.
All of the tasks from the check list you selected are added to the work order's Check Lists subtab.
- (Optional) Remove any of the newly added items from the list by clicking to select it and then clicking the Delete Item button.
- (Optional) Rearrange the order of the tasks that you just added by clicking to select them and then clicking the Up, Down, Top, and Bottom buttons.
- In the Exception column, for each task, select the exception note that end users will be able to select if the task cannot be completed. Leave this field set to the default "Unspecified" if you want the user to be able to select from a list of notes.
- To add a new task line to the check list, complete the following steps:
- Click the Add Item button.
- On the Add Check Lists Item screen that pops up, enter a description of the task.
- Select, deselect, and/or edit each exception note on the screen to create a list of exception notes that end users will be able to select from if the current task cannot be completed.
- Repeat the previous three steps for each additional task you want to add to the checklist.
- (Optional) In the Note column, add, edit, or review notes relating to the check list tasks.
- When you have finished, click the Save button at the top of the screen, then select the Save option from the drop-down list that appears.