Create a Role
Roles are a means of assigning permissions to users. For
each role you create, you specify what tabs and menus in the application
the users with that role can access. Each
user is assigned a role based on his or her particular responsibilities.
A service
technician might typically be assigned a role with fairly limited permissions, whereas a system
administrator or personnel manager would likely have broader
permissions.
To create a role, complete the following steps:
- Go to User > Role Administration > List
- The Role
screen opens.
- Click the Add New button.
- The
New Role Set Up screen opens.
- Click Next.
- On the Role Name screen that opens, type
a name in the Display Name field. For
example, if you are creating a role for your service personnel, you
might call it "Field Personnel" or something similar.
- Set the "not to exceed" (NTE) field to either unlimited or to a value that you enter.
- Click Next.
- The
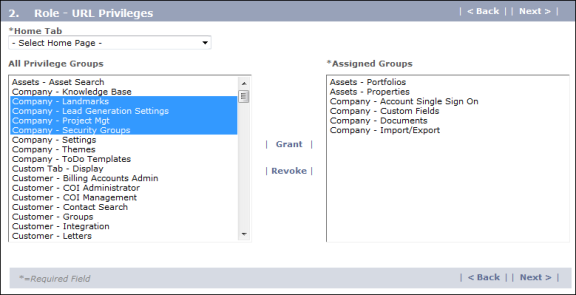
Role - URL Privileges screen opens. Show me
-

- Assign privileges for this role by making
selections in the All Privilege Groups field. This
field contains an alphabetical list of all of the system drop-down lists
and the items available on each menu as well as other permissions, such
as those for mobile devices. Hold
down the Ctrl key to make multiple selections.
- After selecting the privileges you want to associate with the new role, click the Grant button to move the privileges to the Assigned
Groups field.
- In the Home Tab drop-down list, select the home page that will be displayed whenever a user with this role logs in to the
system. For
a technician, this would typically be Work Orders (My Work).
- Note: The Home Tab list is empty when you first access the screen and is thereafter populated based on the privileges you grant to the role. The more privileges you grant, the wider selection of possible home pages appear in the drop-down list.
- Click Next.
- On the confirmation screen that appears, click Finish.